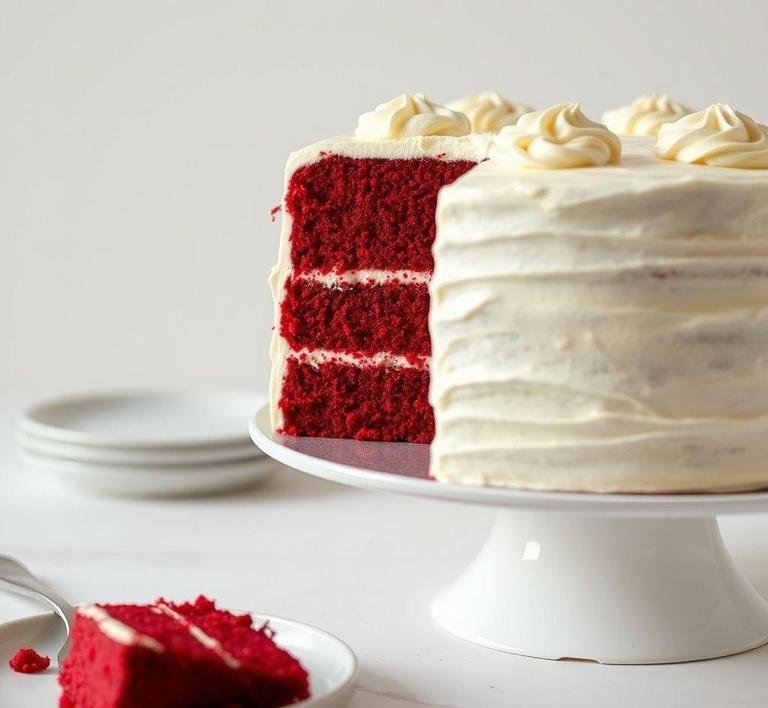
Jamie Oliver’s Red Velvet Cake isn’t just a dessert. it’s a showstopper. This cake is all about indulgence. It’s soft, rich and has that signature red hue that makes it pop on any dessert table. At its heart, it’s a cocoa-based sponge with a hint of tang, paired perfectly with creamy, smooth frosting-usually cream cheese.
But Jamie adds his twist. Unlike some overly sweet versions out there, his red velvet cake strikes a great balance. It’s not just sweet for the sake of it. There’s depth from the cocoa, a gentle acidity from buttermilk or vinegar and a lightness that makes every bite addictive.
It’s not just a cake. It’s an experience.
Jamie Oliver Red Velvet Cake Recipe
Ingredients Needed
You’ll want to gather everything before you start. Red velvet doesn’t play around when it comes to ingredients-precision is key.
For The Cake
- 250g plain flour (all-purpose)
- 1 tsp baking powder
- 1 tsp bicarbonate of soda
- 1 tbsp cocoa powder (unsweetened)
- A pinch of salt
- 250ml buttermilk (or make your own with milk + vinegar/lemon juice)
- 1 tsp vanilla extract
- 1 tsp white vinegar
- Red food colouring (gel is best for vibrancy)
- 115g unsalted butter (softened)
- 300g caster sugar
- 2 large eggs
For The Cream Cheese Frosting
- 100g unsalted butter (room temp)
- 300g icing sugar (sifted)
- 250g cream cheese (full-fat, cold)
- 1 tsp vanilla extract
Optional: Fresh berries or chocolate curls for topping, depending on your vibe.
Equipment Needed
This cake doesn’t require fancy gadgets but a few essentials will make things smoother.
- Two 8-inch round cake tins (or three smaller ones for extra layers)
- Mixing bowls
- Electric hand mixer or stand mixer (a whisk works too. just takes longer)
- Sieve for dry ingredients
- Spatula for folding and scraping
- Baking paper
- Wire rack for cooling
- Palette knife or offset spatula (for smooth frosting)
- Measuring spoons and digital scale (accuracy is everything)
How To Make Jamie Oliver’s Red Velvet Cake
Let’s break it down step-by-step so you know what to expect. No rushing-this cake rewards patience.
1. Prep Your Gear
Start by preheating the oven to 180°C (350°F). Grease your cake tins and line the bottoms with baking paper. This helps the cake slide out like a dream.
2. Mix The Dry Stuff
In a big bowl, sift together the flour, cocoa powder, salt, baking powder and bicarb. This gets rid of lumps and keeps the sponge light.
3. In Another Bowl…
Whisk the buttermilk, vanilla extract, vinegar and a good squeeze of red food colouring. You’re looking for a vibrant red-not pink. Set that aside.
4. Cream The Butter & Sugar
In a separate mixing bowl, beat the butter and sugar together until it’s pale and fluffy. This takes a few minutes. You’re building air here.
5. Add The Eggs
Beat in the eggs one at a time, making sure everything is well combined. Scrape the sides down with a spatula to catch any sneaky bits.
6. Bring It All Together
Add the dry mix and the red buttermilk mix to the butter mixture, alternating in batches. Start and end with dry. Gently mix-don’t overdo it. You want it just combined.
7. Bake
Divide the batter evenly between your tins. Smooth the tops and bake for 25-30 minutes or until a toothpick comes out clean. Let the cakes cool in the tins for 10 minutes, then transfer to a wire rack to cool completely.
8. Make The Frosting
Beat the butter and icing sugar until fluffy. Add the cream cheese and vanilla and mix just until smooth. Don’t overbeat-the frosting can go runny.
9. Assemble
Once the cakes are cool, spread frosting between the layers and over the top and sides. Go for a smooth finish or rustic swirls-up to you.
Optional: Top with berries, chocolate shavings or even cake crumbs for a bakery-style finish.
What I Learnt
Here’s what stood out after making Jamie’s version of red velvet cake:
- The balance of flavors is everything. The vinegar and buttermilk aren’t just there for science. they add that essential tang that cuts through the sweetness.
- Don’t skimp on the colouring. A few drops won’t cut it. Gel food colouring gives that dramatic red without watering down the batter.
- Cold cream cheese is key. It keeps the frosting thick and spreadable. Let the butter soften, not the cheese.
- Layering takes patience. Level your cakes if needed so you don’t end up with a Leaning Tower of Red Velvet.
- Resting the cake improves the flavor. If you can, refrigerate it for a few hours (or overnight). The flavors meld and it slices beautifully.
Recipe Tweaks For Jamie Oliver’s Red Velvet Cake
Jamie’s version of red velvet is already a treat. but there’s always room to play.
1. Swap the Food Coloring:
Not everyone loves the idea of dumping in loads of artificial red dye. Try beetroot powder instead. It’s natural, gives a subtle earthiness and keeps that gorgeous red hue (well, reddish. don’t expect neon). Just blend it into your dry ingredients and you’re good to go.
2. Buttermilk Alternatives:
No buttermilk in the fridge? No sweat. Mix a tablespoon of lemon juice or vinegar into regular milk and let it sit for about 10 minutes. Or use plain Greek yogurt thinned with a splash of milk. It keeps the cake tangy and tender.
3. Level Up the Cocoa:
Jamie uses a touch of cocoa for that signature hint of chocolate. Want more depth? Try Dutch-processed cocoa-it’s darker and richer. Or toss in a handful of mini chocolate chips if you’re feeling wild.
4. Cream Cheese Frosting, But Better:
Jamie keeps the frosting classic: cream cheese, butter, icing sugar. If you want to cut the sweetness, add a spoonful of sour cream or a pinch of salt. For a twist, add orange zest or even a splash of bourbon. Yes, bourbon.
5. Moisture Hack:
Cakes can dry out fast. especially layered ones. Before frosting, brush the layers with a simple syrup (equal parts sugar and water, simmered and cooled). It locks in moisture and adds a bakery-style finish.
Storage Tips For Leftovers
Leftover red velvet cake is a rare gift. Let’s treat it right.
Room Temperature:
If it’s frosted with cream cheese, don’t leave it out more than a few hours. Otherwise, you’re flirting with food safety roulette.
Fridge:
Wrap slices tightly in cling film or store in an airtight container. Keeps well for up to 5 days but it’s best in the first 2-3 when it’s still plush and dreamy. Pro tip: let slices sit at room temp for 20 minutes before eating-they’ll taste fresher.
Freezer:
Yes, you can freeze it! Wrap individual slices in plastic wrap and pop them in a freezer bag. They’ll last about 2 months. Thaw overnight in the fridge or give them a couple of hours on the counter. Frosting might lose a little texture but the flavor holds up.
What To Eat With Jamie Oliver’s Red Velvet Cake?
Red velvet’s got that rich, cocoa-tangy thing going on. So pair it with flavors that complement, contrast or cut through the decadence.
1. Fresh Berries:
Raspberries or strawberries bring a juicy, tart bite. Scatter them on the plate or serve on the side with a little mint.
2. Coffee or Espresso:
Not just a drink. this is your cake’s soulmate. A strong espresso makes that cocoa pop. Cold brew also works if you like it chilled.
3. Vanilla Ice Cream:
The classic combo. Soft, cold vanilla next to a rich slice? It’s a texture and temp dream. Bonus: it balances the tangy frosting.
4. Sparkling Wine or Champagne:
Hosting a brunch or celebration? Bubbles and red velvet are a match. Go for dry sparkling wine. it’ll cut the sweetness perfectly.
5. Salted Nuts:
Odd? Maybe. But a little salted almond or pistachio crunch on the side adds a savory pop that makes each bite more interesting.
FAQs
What Makes Jamie Oliver’s Red Velvet Cake Unique?
His recipe includes a balance of tangy cream cheese frosting with a moist, light cake, and he adds a touch of vinegar for the classic red velvet flavor.
Can I Use Regular Food Coloring Instead Of Red Food Coloring?
It’s best to use red food coloring for that deep, vibrant color. Substituting may change the look, but you can try natural coloring alternatives if you prefer.
How Do I Know When The Cake Is Done Baking?
Insert a skewer into the center of the cake. If it comes out clean or with just a few crumbs, it’s ready!