Jamie Oliver’s Plum Jam is exactly what you’d expect-sweet, tangy, a little rustic and bursting with the flavor of ripe plums. It’s his take on a classic preserve, stripped down to its essentials. No overly fancy tricks, just good fruit, sugar and time. What sets it apart is the balance. It’s not cloying. It keeps the natural tartness of the plum alive.
This jam works on toast, sure. But it’s also killer on a cheese board, with roast pork or spooned into yogurt. Jamie’s method is simple but it respects the ingredients. It’s not about overcomplicating things. It’s about letting the fruit speak.
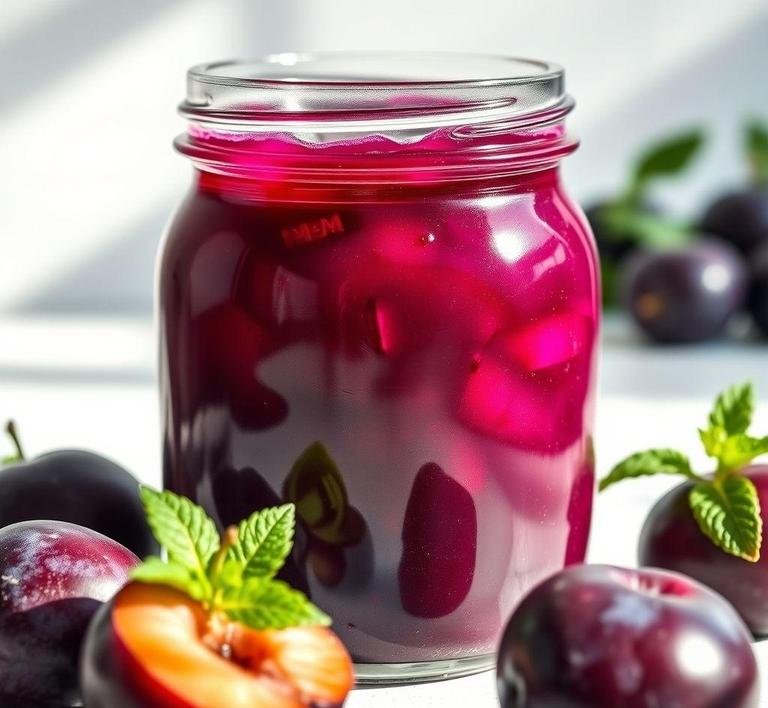
Jamie Oliver Plum Jam Recipe
Ingredients Needed
Here’s what you’ll need to make it the Jamie Oliver way. He’s big on quality, so go for the best you can get.
- Plums – About 1 kg. Ripe but not mushy. Look for red or purple ones with a bit of give. A mix of sweet and tart works best.
- Granulated Sugar – Around 1 kg. Regular white sugar does the job just fine.
- Lemon – Juice of 1. This helps set the jam and adds brightness.
- Optional: A cinnamon stick or a vanilla pod if you want a warm twist. Jamie sometimes plays with flavor.
No pectin, no preservatives. Just the basics. The lemon handles the setting, thanks to its natural pectin.
Equipment Needed
You don’t need a professional setup. Here’s what you’ll need:
- Large, heavy-bottomed pot – For even heat. Avoid thin pots that burn sugar fast.
- Wooden spoon or heatproof spatula. You’ll be stirring. A lot.
- Jam thermometer (optional but helpful). To know when you hit that magic 105°C (221°F).
- Sterilized jars – Glass, with tight-fitting lids. Clean them well and heat them in the oven before filling.
- Ladle or jug – For pouring the hot jam into jars without burning your fingers.
That’s pretty much it. You can get fancy with a funnel but a steady hand works too.
How To Make Jamie Oliver’s Plum Jam
Here’s the fun part. Making jam feels like a little bit of kitchen alchemy. Here’s how Jamie walks you through it:
-
Prep the plums.
Wash them, halve them and remove the stones. Don’t worry about peeling. The skin adds color and depth.
-
Get the pot going.
Toss the plums into your pot with a splash of water. just a few tablespoons to stop them catching early on. Simmer gently for about 10-15 minutes until they start breaking down and turning jammy.
-
Add the sugar.
Once the fruit is soft, stir in the sugar and lemon juice. Mix well. You’ll feel it thicken almost immediately as the sugar dissolves.
-
Boil hard.
Now crank up the heat. Bring it to a rapid boil and keep it there. Stir constantly so it doesn’t burn. You’re aiming for setting point. about 105°C (221°F). If you don’t have a thermometer, test by dropping a bit of jam on a cold plate. If it wrinkles when pushed, it’s ready.
-
Remove and rest.
Take it off the heat. Skim any foam off the top. Let it sit for 5-10 minutes before ladling into jars. This helps the fruit bits stay evenly suspended instead of floating to the top.
-
Pour and seal.
Carefully ladle the jam into hot jars. Seal tightly. Let them cool at room temp.
That’s it. You made jam. Jamie would high-five you right about now.
What I Learnt
Making plum jam taught me more than just how to preserve fruit.
First, patience matters. You can’t rush jam. Boiling too soon, not watching closely. those little missteps cost flavor and texture.
Second, the fruit makes the jam. If your plums aren’t good, your jam won’t be either. Jamie’s all about the quality of ingredients and now I get why. You really taste the plums.
Third, sugar is not the enemy. I used to think all that sugar was excessive. But here, it’s essential. not just for sweetness but for setting and preserving.
Lastly, there’s something incredibly satisfying about filling jars with something you made from scratch. Especially when it tastes this good.
Recipe Tweaks For Jamie Oliver’s Plum Jam
Jamie Oliver’s plum jam is a classic-sweet, tart and loaded with juicy flavor. But that doesn’t mean you can’t play around with it. Here’s how to tweak it and make it your own.
1. Add a little spice.
Want something warming? Toss in a cinnamon stick or a star anise pod while the plums cook down. A bit of grated ginger also gives the jam a zippy kick. Just remove whole spices before jarring.
2. Use a mix of plums.
Jamie often uses Victoria plums but feel free to mix in a few greengages or damsons. Greengages are sweeter, damsons are tarter. A blend adds depth and complexity.
3. Less sugar, more fruit?
The original recipe is quite sweet. If you prefer something more fruit-forward, cut the sugar by about a quarter. but do know this may shorten shelf life. Add a squeeze of lemon juice to help with setting.
4. Want it chunky or smooth?
Jamie’s jam usually has a rustic texture. If you prefer a smoother spread, blitz the mixture with an immersion blender once the fruit has softened (before adding sugar). For something in between, mash with a fork.
5. Alcohol, anyone?
Add a splash of brandy, rum or plum wine at the end of cooking for a grown-up twist. Don’t overdo it-just a tablespoon or two will do.
6. Twist with herbs.
This might sound odd but thyme or rosemary can work beautifully. Infuse briefly during cooking, then pull the sprigs out before bottling. It gives the jam a savory edge that’s brilliant with cheese.
Storage Tips For Leftovers
Plum jam is magical but it won’t stay perfect forever-unless you store it right.
1. Sterilize your jars.
Before you even ladle in the jam, make sure the jars are squeaky clean and sterilized. A quick rinse in hot, soapy water, then 10 minutes in a 180°C (350°F) oven will do the trick. Boil the lids separately.
2. Keep it sealed.
If the jar seals properly (that satisfying pop when you open it!), your jam can last up to a year in a cool, dark cupboard. Think pantry or cupboard. not a shelf next to the oven.
3. Opened a jar? Fridge it.
Once you crack open a jar, it goes in the fridge. Use within 4 weeks for best flavor and texture. Always use a clean spoon-no double-dipping.
4. Freeze small portions.
Got leftovers you won’t eat soon? Scoop jam into silicone ice cube trays, freeze, then pop the cubes into a freezer bag. Great for single servings or baking. Thaws quickly, too.
What To Eat With Jamie Oliver’s Plum Jam?
Sure, it’s good on toast. But that’s just the start. Jamie’s plum jam can go places.
1. On cheese boards.
Pair it with sharp cheddar, brie or goat cheese. The jam’s sweetness cuts through the richness. Add some crusty bread and a few walnuts-chef’s kiss.
2. Swirled into yogurt.
A spoonful of plum jam in Greek yogurt turns breakfast into dessert. Add some granola and fresh berries if you’re feeling extra.
3. In baking.
Use it as a filling for thumbprint cookies, tarts or even a sponge cake. It melts beautifully and keeps its flavor.
4. As a glaze.
Warm it up with a splash of vinegar or mustard and brush it over pork chops, duck or even grilled halloumi. That balance of sweet and sour is next-level.
5. On pancakes or waffles.
Move over maple syrup. A dollop of warm plum jam and a dusting of powdered sugar? Now we’re talking brunch goals.
6. In cocktails (yep).
Stir a spoonful into a gin and tonic or shake it into a whiskey sour. Adds body, color and a hit of plum flavor you didn’t know you needed.
FAQs
What Type Of Plums Are Best For Jamie Oliver’s Plum Jam?
For the best results, go for ripe, slightly tart plums like Victoria plums or damsons. They balance sweetness and acidity.
Can I Use A Different Sweetener Instead Of Sugar?
Yes, you can use honey or a sugar substitute, but the texture and flavor might change slightly. Make sure to adjust the quantities.
How Long Does Jamie Oliver’s Plum Jam Last After Making It?
If stored properly in sterilized jars, the jam can last up to a year. Once opened, keep it in the fridge for up to a month.