Jamie Oliver’s Air Fryer Chicken Kiev is a modern twist on the classic Chicken Kiev, using an air fryer for a healthier, quicker and just as delicious result. Traditionally, Chicken Kiev is a breaded chicken breast stuffed with a garlicky herb butter, then deep-fried until crispy. Jamie’s version skips the deep-frying process, relying on the air fryer to crisp up the coating while keeping the inside juicy and flavorful. It’s the perfect way to enjoy the indulgence of a Chicken Kiev without all the grease and hassle of traditional frying.
Jamie’s recipe takes the best of the original-garlic butter, crispy breadcrumbs and tender chicken. but adds an easy, accessible approach with minimal cleanup. The air fryer cuts down on cooking time, making it ideal for busy weeknights or a weekend treat when you don’t want to spend hours in the kitchen.
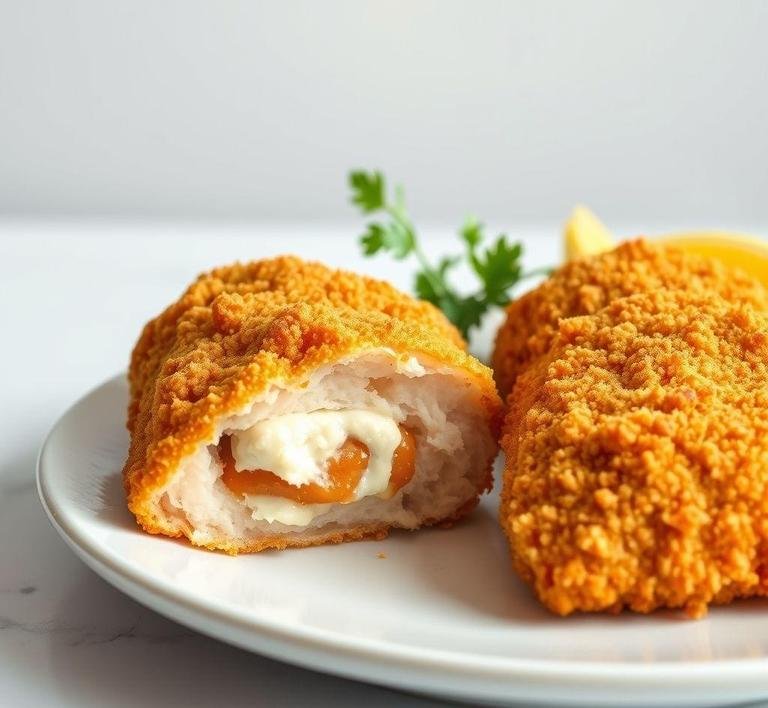
Jamie Oliver Air Fryer Chicken Kiev Recipe
Ingredients Needed
To make Jamie Oliver’s Air Fryer Chicken Kiev, you’ll need a few key ingredients that come together to create a flavorful and crispy dish. Here’s the rundown:
- Chicken Breasts (boneless, skinless). The star of the show. You’ll want chicken breasts that are thick enough to stuff without falling apart.
- Butter – This forms the base of the garlic butter filling, so go for a rich, unsalted butter to give you control over the seasoning.
- Garlic – Fresh garlic is a must for that punchy, aromatic flavor.
- Fresh Parsley – Adds a vibrant color and fresh taste that balances the richness of the butter.
- Breadcrumbs – For that golden, crispy coating. You can use store-bought or make your own if you’re feeling extra.
- Flour – Used for dredging the chicken before it gets coated in the breadcrumbs. This helps the coating stick and crisp up nicely in the air fryer.
- Egg – To bind the breadcrumbs to the chicken, giving you that nice, golden crust.
- Lemon Juice – A little squeeze of lemon brightens up the whole dish and cuts through the richness of the butter.
- Salt and Pepper – Essential for seasoning, especially in the butter and chicken itself.
Equipment Needed
Here’s the simple equipment you’ll need to pull this off:
- Air Fryer – This is the magic tool that makes this recipe come together quickly with minimal oil. Make sure your air fryer can fit the chicken breasts comfortably.
- Mixing Bowls – You’ll need a few for the butter, breadcrumbs, flour and egg.
- Cling Film or Parchment Paper. For wrapping the stuffed chicken or keeping things neat while you prep.
- Meat Mallet or Rolling Pin. This is to flatten the chicken breasts for even cooking and to make room for that glorious garlic butter filling.
- Pastry Brush (optional) – To coat the chicken with a little bit of oil or butter before air frying, helping the breadcrumbs crisp up beautifully.
How To Make Jamie Oliver’s Air Fryer Chicken Kiev
Making this dish is straightforward and doesn’t take a ton of effort. Here’s the step-by-step:
- Prepare the Garlic Butter: Start by mashing together softened butter, minced garlic, parsley, lemon juice, salt and pepper in a bowl. Get it nice and smooth-this will be the flavor-packed filling inside your chicken.
- Prep the Chicken: Flatten the chicken breasts using a meat mallet or rolling pin. You want them thin enough to stuff but not too fragile. Once they’re flattened, season them with a pinch of salt and pepper.
- Stuff the Chicken: Place a generous amount of garlic butter in the center of each chicken breast. Roll it up tightly, securing the edges with toothpicks or kitchen twine to hold the butter inside as it cooks.
- Coat the Chicken: First, dredge each stuffed chicken roll in flour, then dip it into the beaten egg and finally coat it with breadcrumbs. You want a good, even coating all around to get that crispy, golden exterior.
- Air Fry the Chicken: Preheat your air fryer to 180°C (350°F). Lightly spray the chicken with a bit of oil or melted butter and place it in the air fryer basket. Cook for about 15-20 minutes, flipping halfway through, until the chicken is golden brown and cooked through.
- Serve and Enjoy: Once done, remove the toothpicks or twine and serve your crispy, garlicky masterpiece with your choice of sides. like a simple salad, roasted potatoes or even some steamed veggies.
What I Learnt
This recipe taught me a few things that really changed how I think about cooking with an air fryer:
- Air Frying Isn’t Just for Snacks: You can achieve crispy, golden results with an air fryer even on more substantial dishes like Chicken Kiev. I had always thought the air fryer was for fries and wings but this recipe showed me it’s a versatile tool.
- Stuffing Chicken Can Be Tricky: Getting the butter to stay inside the chicken while cooking takes a bit of patience. Using toothpicks or twine helps a lot but I found that rolling the chicken tightly was key to keeping that buttery filling intact.
- Less Oil Doesn’t Mean Less Flavor: Even without deep frying, the chicken turned out crispy on the outside and juicy on the inside. The trick is to make sure you coat the chicken well and spray a little oil before cooking.
- Prep Ahead: This recipe works well if you prep everything in advance. You can make the garlic butter and even stuff the chicken ahead of time, then just pop it in the air fryer when you’re ready to cook. Makes dinner time a breeze!
Recipe Tweaks For Jamie Oliver’s Air Fryer Chicken Kiev
Jamie Oliver’s Air Fryer Chicken Kiev is already a hit but a few tweaks can take it to the next level. For starters, the classic garlic butter filling can be a little predictable. Why not add some fresh herbs? A handful of finely chopped tarragon or dill works wonders, adding a burst of freshness. Or, if you’re feeling adventurous, try adding a small spoonful of mustard to the butter for a tangy kick. A dash of lemon zest in the mix can also brighten up the garlic butter and add a subtle citrusy zing.
When it comes to the coating while breadcrumbs are traditional, you can switch things up with panko for extra crunch or even finely crushed cornflakes for a gluten-free option. You could even spice things up with smoked paprika or cayenne pepper for a smoky or spicy twist. Want it even crispier? Give the chicken a quick dip in a flour and egg wash before adding the breadcrumbs to create a double-layered coating.
Lastly, for an even juicier bite, you can consider brining the chicken breasts in salt water for 30 minutes before stuffing them. This ensures that the chicken stays moist while cooking, especially when you’re using the air fryer which can sometimes dry out lean meats.
Storage Tips For Leftovers
If you find yourself with leftovers (lucky you!), storing them properly can help you keep that crispy, garlicky goodness intact. Let the chicken Kiev cool down completely before putting it in an airtight container. It’s key to prevent condensation which could make the coating soggy. If you’re storing it for more than a day, consider wrapping the chicken in foil before putting it in the container to maintain its texture.
For reheating, the air fryer is your best friend again. Preheat it to 350°F (175°C) and heat the chicken for 5-8 minutes until it’s heated through and the coating becomes crispy again. If you don’t have an air fryer, the oven works too, just keep it on a rack so the heat circulates evenly around the chicken. Avoid microwaving, though-it’ll likely make the breading soggy and the chicken a bit rubbery.
If you have extra garlic butter, you can store it in the fridge for up to a week or freeze it for longer storage. Just make sure it’s sealed in an airtight container.
What To Eat With Jamie Oliver’s Air Fryer Chicken Kiev?
Chicken Kiev has that rich, buttery flavor that pairs perfectly with something light and fresh. Try serving it with a simple side salad. think mixed greens with a lemon vinaigrette or a tangy coleslaw to cut through the richness. A side of roasted vegetables like carrots, parsnips or green beans would also complement the dish well, adding a bit of earthiness.
For something a little more indulgent, mashed potatoes are a classic option. You can go for creamy mashed potatoes with butter and garlic or even something a bit different like mashed sweet potatoes or cauliflower mash for a twist.
If you want to add an extra crunch and a burst of flavor, try serving the chicken Kiev with a side of crispy fried potatoes or even oven-baked wedges. You can never go wrong with a slice of buttery garlic bread to mop up any leftover garlic butter!
FAQs
Can I Use Frozen Chicken Breasts For Jamie Oliver’s Air Fryer Chicken Kiev?
Yes, you can! Just make sure to adjust the cooking time by adding a few extra minutes until the chicken is fully cooked.
What Is The Best Temperature To Cook Chicken Kiev In An Air Fryer?
Jamie recommends setting the air fryer to 180°C (350°F) for a crispy, golden result.
How Do I Make The Garlic Butter For Chicken Kiev?
Simply mix softened butter with garlic, fresh parsley, lemon zest, and a pinch of salt. Then stuff it into the chicken before air frying.